WTF zkSync极简入门: 7. Dapp开发教程
这个系列教程帮助开发者入门 zkSync 开发。 推特:@0xAA_Science|@WTFAcademy_
所有代码和教程开源在 github: github.com/WTFAcademy/WTF-zkSync
在本教程中,我们将会完成:
- 与已创建的NFT,TOKEN,TOKENPaymaster合约进行交互
- 了解与使用zkSync基于React技术栈下的开发工具
- 构建一个集成Paymaster支付的NFT铸造页面,以允许用户使用ERC20 代币支付交易费用
先决条件:
- 获取zkSync Sepolia测试网ETH:https://learnweb3.io/faucets/zksync_sepolia/,https://docs.zksync.io/build/tooling/network-faucets.html
- 了解Paymaster(可查看前面的教程)
相关工具:
- nextjs: 项目使用React 和 Nextjs作为前端框架
- ethers5: zkSync与主网相同,都可采用ethers作为主要合约交互工具库使用
- zksync-ethers5: 此库在ethers基础上封装/附加功能,本教程将会采用其完成我们的paymaster集成到铸造NFT中。(注:若不使用zkSync独特的功能如抽象账户,Paymaster等与ethers无异,直接使用ethers即可,不影响以往主网开发使用工具的流程)
- web3modal: 快捷美观的钱包工具库,提供连接钱包的集成UI和相应的逻辑
配置项目:
下载基础项目和安装依赖
git clone https://github.com/WTFAcademy/WTF-zkSync.git
cd WTF-zkSync/07_DAPP/template
pnpm i / yarn / npm install目录结构:
常见的nextjs目录结构,我们主要入口是
(main)/page.tsx然后划分两个step:连接钱包,铸造NFT,同时将所有合约相关逻辑抽到hook中完成。zksync-nft-demo
├── app
│ ├── (main)
│ │ ├── page.tsx
│ │ ├── step-connect-wallet.tsx
│ │ └── step-mint.tsx
│ ├── globals.css
│ ├── layout.tsx
│ └── providers.tsx
├── components
│ ├── checkout.tsx
│ ├── connect-button.tsx
│ ├── icons.tsx
│ ├── mint-nft-modal.tsx
│ ├── mint-token-modal.tsx
│ └── ui
├── constants
│ └── contract.ts
├── context
│ └── web3-modal.tsx
├── hooks
│ ├── use-nft.ts
│ ├── use-paymaster.ts
│ └── use-token.ts
├── lib
│ └── utils.ts
合约简单介绍:
合约都已开源,可以在https://sepolia.explorer.zksync.io/找到
NFT合约: 对外暴露mint接口给用户执行,无限制
 function mint(address recipient, string memory stoneName) public {
    require(bytes(stoneName).length > 0, "stoneName must not be empty");
    require(recipient != address(0), "recipient must not be the zero address");

    _safeMint(recipient, tokenId);
    _ownedTokens[recipient].push(tokenId);
    _setTokenURI(tokenId, stoneName);
    tokenId++;
}Token合约: 普通ERC20,对外暴露mint,无限制
function mint(address _to, uint256 _amount) public returns (bool) {
   _mint(_to, _amount);
   return true;
}Paymaster合约: ERC20交易支付方案,允许前者token的持有者支付token作为gas手续费支付
前端开发
启动项目后,我们会看到一个连接钱包和一个初步完成的铸造界面

连接钱包
每个Dapp应用最开始肯定就是连接钱包了,我们这边将采用web3modal + ethers5来完成这个步骤:
- 首先进入
context/web3-modal.tsx完成web3modal的初步构建,可以参考链接,注意需要前往https://cloud.walletconnect.com注册一个projectid'use client'
import { createWeb3Modal, defaultConfig } from '@web3modal/ethers5/react'
// 1. Get projectId at https://cloud.walletconnect.com
const projectId = '' // 自行申请一个
// 2. Set chains
export const zkSyncSepoliaTestnet = {
chainId: 300,
name: "zkSync Sepolia Testnet",
currency: "ETH",
explorerUrl: "https://sepolia.explorerzksync.io/",
rpcUrl: "https://sepolia.era.zksync.dev",
}
// 3. Create modal
const metadata = {
name: 'Web3Modal',
description: 'Web3Modal ZkSync Example',
url: 'https://web3modal.com', // origin must match your domain & subdomain
icons: ['https://avatars.githubusercontent.com/u/37784886']
}
export const {getWalletProvider} = createWeb3Modal({
ethersConfig: defaultConfig({ metadata }),
chains: [zkSyncSepoliaTestnet],
projectId,
enableAnalytics: true // Optional - defaults to your Cloud configuration
})
export function Web3ModalProvider({ children }: { children: React.ReactNode }) {
return children
} - 将其引用到在最上层使用,进入
app/providers.tsx'use client'
import { Web3ModalProvider } from '@/context/web3-modal';
import React, { ReactNode } from 'react'
import { QueryClient, QueryClientProvider } from 'react-query';
const queryClient = new QueryClient()
export default function Providers({ children }: { children: ReactNode }) {
return (
<QueryClientProvider client={queryClient}>
<Web3ModalProvider>
{children}
</Web3ModalProvider>
</QueryClientProvider>
)
} - 入口我们自己定义一下连接按钮样式,再使用
useWeb3Modal的open打开连接钱包弹窗进行钱包连接,切换网络等操作,同时使用useWeb3ModalAccount给出的状态adress,isConnected在UI层做出一些交互优化展示const StepConnectWallet = ({next}: {next: () => void}) => {
const { open } = useWeb3Modal();
const {address, isConnected} = useWeb3ModalAccount();
const handleClick = () => {
open().catch(console.error);
}
useEffect(() => {
if (isConnected) {
next();
}
}, [isConnected]);
return (
<div className="px-10 py-8 bg-[#ffffff] rounded-lg shadow flex items-center justify-center">
<button className="rounded-lg border-px border-border" onClick={handleClick}>
<div className="flex items-center gap-3 justify-center">
<Icons.wallet className="w-4 h-4" />
<span>{isConnected ? (
<span className="flex items-center gap-2">
<span>已连接</span>
<span className="text-[#000000] text-sm">{truncate(address!)}</span>
</span>
) : "连接钱包"}</span>
</div>
</button>
</div>
)
}
- 首先进入
此时已经完成了我们钱包的逻辑处理,接下来我们要深入合约交互逻辑处理,我们要做的就是基于合约完成3个hooks:useToken, usePaymaster, useNFT
- usePaymaster
- 我们将会在此hook中完成paymaster的部分参数组装,以便快速运用到其他的合约调用中,并且获取paymaster余额,来告知用户是否仍然可以继续使用token替代gas支付, 以下关键代码中我们采用type为
ApprovalBased来完成Token的逻辑处理,并且设定minimalAllowance为指定值,此处表示支付的Token数量用于替换手续费支出,这里实际上会更具具体的需求还给出动态的值,我们为了简单处理每笔交易都只需要支出1个token即可:const paymasterParams = utils.getPaymasterParams(PAYMASTER_ADDRESS, {
type: "ApprovalBased",
token: TOKEN_ADDRESS,
// set minimalAllowance as we defined in the paymaster contract
minimalAllowance: ethers.utils.parseEther("1"),
// empty bytes as testnet paymaster does not use innerInput
innerInput: new Uint8Array(),
}); - 完整代码:
const usePaymaster = () => {
const { isConnected } = useWeb3ModalAccount()
const { walletProvider } = useWeb3ModalProvider()
const {isLoading, data: paymasterBalance} = useQuery("paymaster", async () => {
const ethersProvider = new Web3Provider(walletProvider!)
const balance = await ethersProvider.getBalance(PAYMASTER_ADDRESS);
return ethers.utils.formatEther(balance);
}, {
enabled: isConnected,
refetchInterval: 3000
})
const paymasterParams = utils.getPaymasterParams(PAYMASTER_ADDRESS, {
        type: "ApprovalBased",
        token: TOKEN_ADDRESS,
        // set minimalAllowance as we defined in the paymaster contract
        minimalAllowance: ethers.utils.parseEther("1"),
        // empty bytes as testnet paymaster does not use innerInput
        innerInput: new Uint8Array(),
});
return {
paymasterBalance,
isLoading,
customData: {
gasPerPubdata: utils.DEFAULT_GAS_PER_PUBDATA_LIMIT,
paymasterParams,
}
}
}
- 我们将会在此hook中完成paymaster的部分参数组装,以便快速运用到其他的合约调用中,并且获取paymaster余额,来告知用户是否仍然可以继续使用token替代gas支付, 以下关键代码中我们采用type为
- useToken
- 该合约我们首先需要完成获取token余额,mint用于支付替代手续费,参考代码内容:
const useToken = () => {
    const { isConnected, address } = useWeb3ModalAccount()
    const { walletProvider } = useWeb3ModalProvider()

    const { customData } = usePaymaster();

    const contract = useMemo(() => {
        if (!isConnected) return null;
        const ethersProvider = new Web3Provider(walletProvider!)
        const signer = ethersProvider.getSigner();
        return new Contract(TOKEN_ADDRESS, TOKEN_ABI, signer);
    }, [isConnected, address])

    const { data: tokenBalance, refetch: refetchToken } = useQuery(
        ["token", address],
        async () => {
            const erc20Contract = contract!;
            const balance = await erc20Contract.balanceOf(address);
            return ethers.utils.formatEther(balance).toString();
        },
        {
            enabled: isConnected,
            refetchInterval: 0
        }
    )

    const { data: mintTx, isLoading: isMintLoading, mutateAsync: mint } = useMutation(
        ["mint", address],
        async () => {
            const erc20Contract = contract!;
            const tx = await erc20Contract.mint(address, ethers.utils.parseEther("1000"), {
                customData: ethers.utils.parseEther(tokenBalance!) > ethers.utils.parseEther("1") ? customData : undefined
            });
            await tx.wait();
            return tx;
        },
        {
            onSuccess: () => {
                refetchToken();
                toast.success("mint 1000 token success");
            },
            onError: (error: any) => {
                console.log(error);
                toast.error(error.data.message);
            }
        }
    )

    return {
        tokenBalance,
        refetchToken,
        mint,
        mintTx,
        isMintLoading,
    }
} - 在Paymaster调用的过程中,是需要用户token授权Paymaster合约才可调用,我们需要完善增加授权逻辑
// ...其他省略

const {data: allowance, refetch: refetchAllowance} = useQuery(["tokenAllowance", address], async () => {
    const erc20Contract = contract!;
    const allowance = await erc20Contract.allowance(address, customData.paymasterParams.paymaster);
    return allowance;
}, {
    enabled: isConnected,
    refetchInterval: 0
})

const {
    data: approvePaymasterTx,
    isLoading: isApprovePaymasterLoading,
    mutateAsync: approvePaymaster
} = useMutation("approve", async () => {
    const erc20Contract = contract!;
    const tx = await erc20Contract.approve(
        PAYMASTER_ADDRESS,
        ethers.constants.MaxUint256
    );
    await tx.wait();
    return tx;
}, {
    onSuccess: () => {
        toast.success("approve paymaster success");
        refetchAllowance();
    }
})

return {
    // ...省略其他
    isAllowancePaymaster: allowance?.gte(ethers.utils.parseEther("1")),
  approvePaymaster,
  isApprovePaymasterLoading,
  approvePaymasterTx,
} - 我们期望页面能够展示Token Mint环节产生的Gas消耗情况,以及利用余额判断是否满足paymaster调用(paymaster限制了最少需要1个token),我们增加两个内容:
const getTokenMintEstimate = async () => {
    const ethersProvider = new Web3Provider(walletProvider!)
    const erc20Contract = contract!;
    const gasEstimate = await erc20Contract.estimateGas.mint(address, ethers.utils.parseEther("1000"));
    const gasPrice = await ethersProvider.getGasPrice();
    const cost = gasPrice.mul(gasEstimate);

    return {
        gas: ethers.utils.formatEther(gasEstimate).toString(),
        gasPrice: ethers.utils.formatEther(gasPrice).toString(),
        cost: ethers.utils.formatEther(cost).toString()
    }
}

return {
    //...
    getTokenMintEstimate,
    canNonGas: tokenBalance ? ethers.utils.parseEther(tokenBalance!) > ethers.utils.parseEther("1") : false
}
- 该合约我们首先需要完成获取token余额,mint用于支付替代手续费,参考代码内容:
- useNFT
- NFT合约中我们需要完成NFT持有数量查询,mint NFT逻辑,同时mint时,我们集成了paymaster的支付手段,首先我们需要关注的是我们采用的是zksync-ethers的
Contract和Web3Provider这是官方扩展的类,里面涉及了抽象账户,Paymaster逻辑等zksync独特的功能,我们这边需要用到paymaster,故我们不能直接采用ethers里面构建合约;其次我们在调用合约的时候传入customData即可,这里我们在前面usePaymaster中已经提及,这是调用paymaster的关键:// 截取代码组合,不可运行
import { Contract, Web3Provider } from "zksync-ethers";
import { ethers } from "ethers";
const contract = useMemo(() => {
if (!isConnected) return null;
const ethersProvider = new Web3Provider(walletProvider!)
const signer = ethersProvider.getSigner();
return new Contract(NFT_ADDRESS, NFT_ABI, signer);
}, [isConnected, address])
async () => {
if (!contract) return null;
const tx = await contract.mint(address, "Space Stone", {
customData: canNonGas ? customData : undefined
});
await tx.wait();
return tx;
} - 将其完善到hook中:
const useNft = () => {
    const { isConnected, address } = useWeb3ModalAccount()
    const { walletProvider } = useWeb3ModalProvider()

    const { canNonGas } = useToken();
    const { customData } = usePaymaster();

    const contract = useMemo(() => {
        if (!isConnected) return null;

        const ethersProvider = new Web3Provider(walletProvider!)
        const signer = ethersProvider.getSigner();
        return new Contract(NFT_ADDRESS, NFT_ABI, signer);
    }, [isConnected, address])

    const { data: nftBalance, refetch } = useQuery(["nftBalance", address], async () => {
        if (!contract) return null;
        const balance = await contract.balanceOf(address);
        return balance.toString();
    }, {
        enabled: isConnected,
        refetchInterval: 0
    })

    const {
        data: mintTx,
        isLoading: isMintLoading,
        mutateAsync: mint
    } = useMutation(["mintNft", address], async () => {
        if (!contract) return null;
        const tx = await contract.mint(address, "Space Stone", {
            customData: canNonGas ? customData : undefined
        });
        await tx.wait();
        return tx;
    }, {
        onSuccess: () => {
            toast.success("NFT minted successfully");
            refetch();
        },
        onError: (err: any) => {
            toast.error(err.message);
        }
    })

    return {
        nftBalance,
        mintTx,
        isMintLoading,
        mint,
    }
} - 当然我们也要与token类似,为了辅助我们页面展示mint NFT消耗Gas的情况,我们也加入了getNFTMintEstimate计算,在hook中增加函数
const getNFTMintEstimate = async () => {
    const ethersProvider = new Web3Provider(walletProvider!)
    const nftContract = contract!;
    const gasEstimate = await nftContract.estimateGas.mint(address, "Space Stone");
    const gasPrice = await ethersProvider.getGasPrice();
    const cost = gasPrice.mul(gasEstimate);

    return {
        gas: ethers.utils.formatEther(gasEstimate).toString(),
        gasPrice: ethers.utils.formatEther(gasPrice).toString(),
        cost: ethers.utils.formatEther(cost).toString()
    }
}
- NFT合约中我们需要完成NFT持有数量查询,mint NFT逻辑,同时mint时,我们集成了paymaster的支付手段,首先我们需要关注的是我们采用的是zksync-ethers的
- usePaymaster
前面我们已经完了所有合约交互相关的核心逻辑,接下来我们要把他们运用到页面中,让我们的页面更加完善,我们需完成一下内容,样式部分我已经在模版中完成,只需要使用hooks填充数据即可:
打开
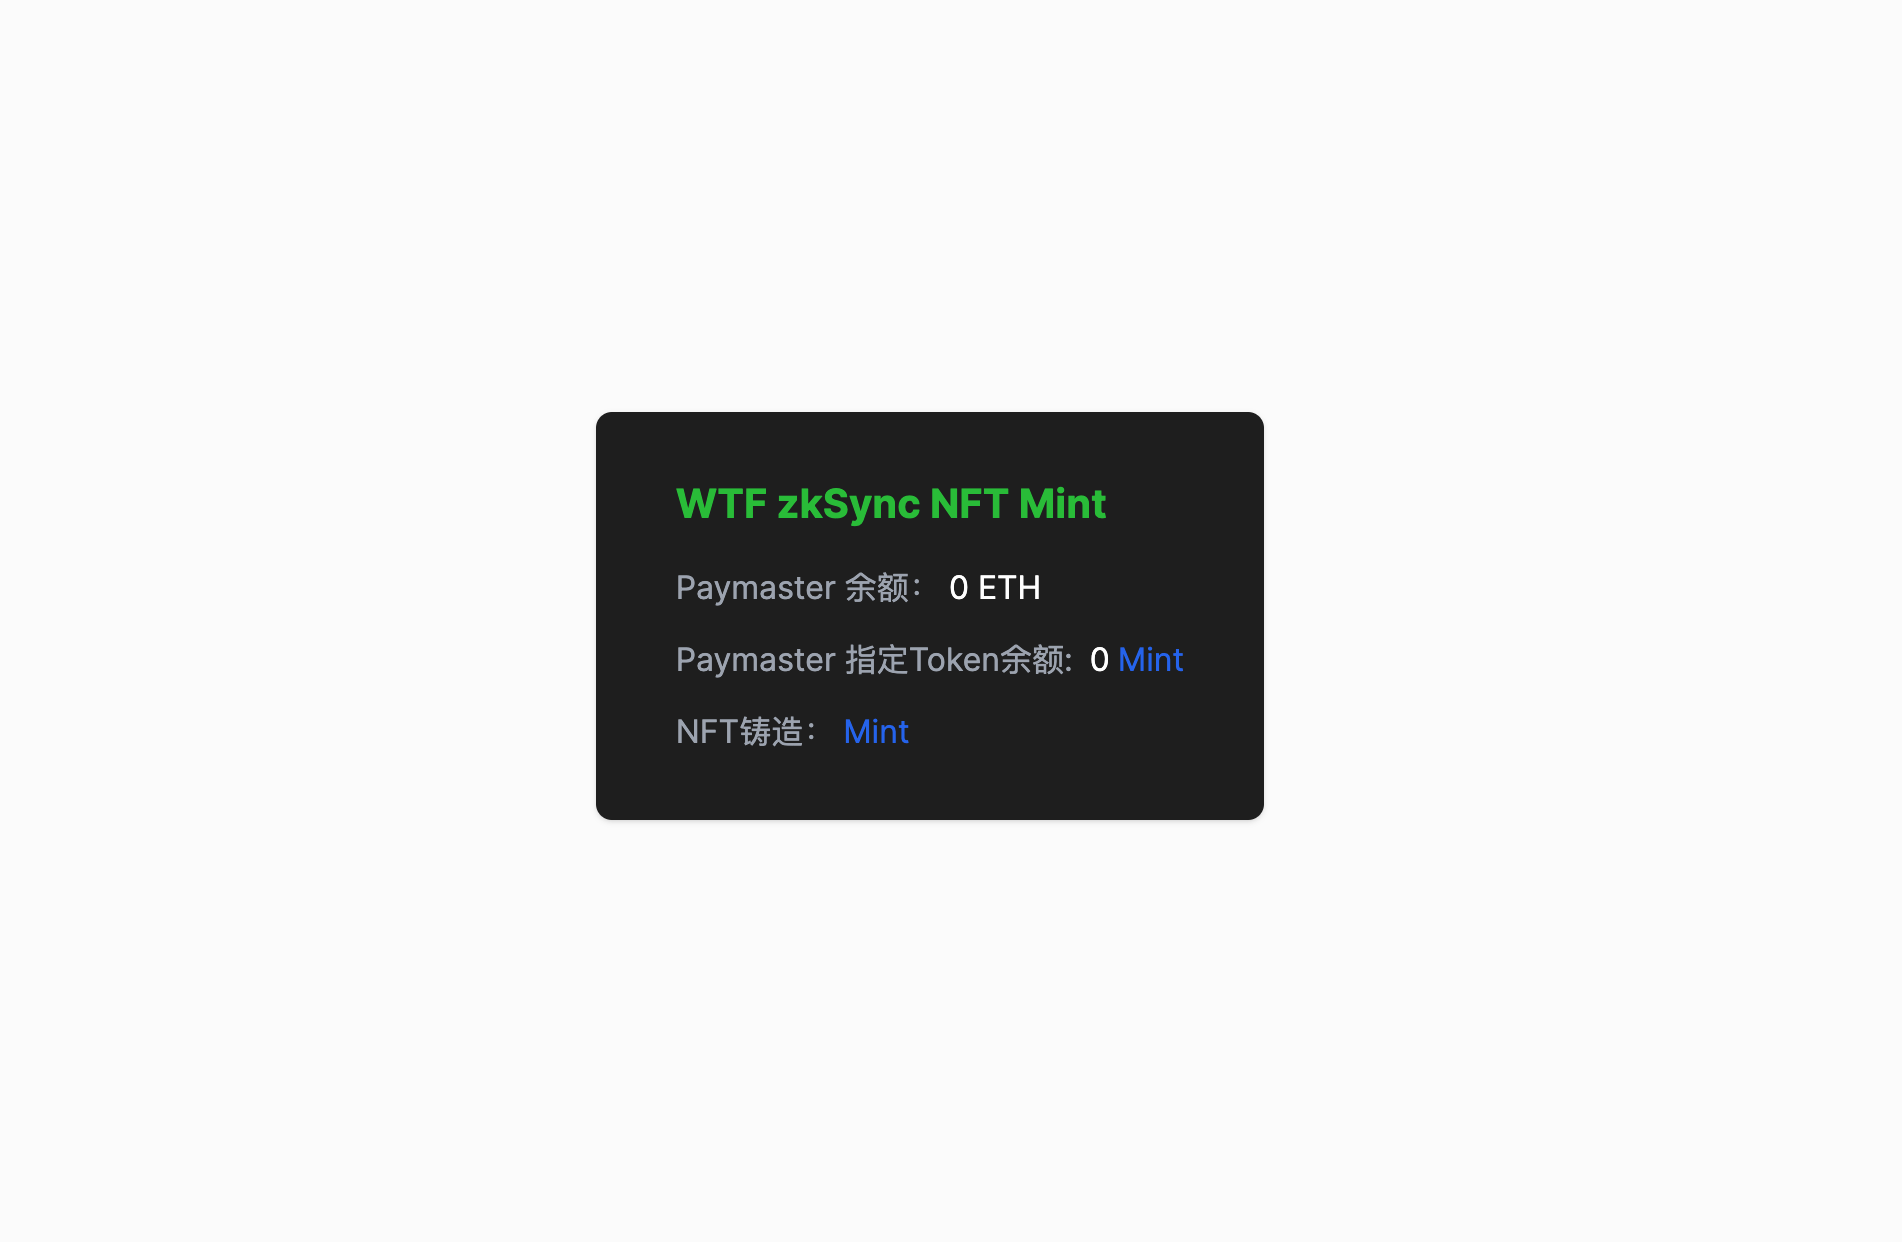
app/(main)/step-mint.tsx完成初始数据加载const StepMint = () => {
const { paymasterBalance } = usePaymaster();
const {tokenBalance} = useToken();
return (
<div className="px-10 py-8 bg-[#1E1E1E] rounded-lg shadow text-[#ffffff] flex flex-col gap-4">
<div className="text-[#29BC38] font-bold text-xl">WTF zkSync NFT Mint</div>
<div className="space-y-3">
<div className="space-x-1">
<span className="text-gray-400">Paymaster 余额:</span>
<span>{paymasterBalance} ETH</span>
</div>
<div className="space-x-1">
<span className="text-gray-400">Paymaster 指定Token余额: </span>
<span>{tokenBalance}</span>
<MintTokenModal />
</div>
<div className="space-x-1">
<span className="text-gray-400">NFT铸造:</span>
<MintNFTModal />
</div>
</div>
</div>
)
}完成
components/mint-token-modal逻辑,以铸造满足Paymaster使用的token金额// 1. 使用 useToken hook 获取 tokenBalance,mint等执行函数和状态
// 2. 计算fee, GasPrice, 实际支出
// 3. 使用Checkout组件展示支付信息
// 4. 新增执行和授权按钮
const MintTokenModal = () => {
const [openModal, setOpenModal] = useState<boolean>(false);
const {
tokenBalance,
getTokenMintEstimate,
mint,
isMintLoading,
canNonGas,
isAllowancePaymaster,
approvePaymaster,
isApprovePaymasterLoading
} = useToken();
const {
data: tokenMintEstimate,
isLoading: isTokenMintEstimateLoading
} = useQuery("tokenMintEstimate", getTokenMintEstimate, {
enabled: openModal
})
return (
<Dialog open={openModal} onOpenChange={setOpenModal}>
<DialogTrigger>
<a className="text-blue-600">Mint</a>
</DialogTrigger>
<DialogContent>
<DialogHeader>
<DialogTitle>领取支付代币 {canNonGas && "(无GAS版)"}</DialogTitle>
<DialogDescription>用于支付手续费的代币</DialogDescription>
</DialogHeader>
<div className="flex flex-col gap-4 mb-4">
<div className="text-sm">代币合约地址:{TOKEN_ADDRESS}</div>
<div className="text-sm">当前账户代币余额:{tokenBalance || 0} WTF</div>
<Checkout
gas={tokenMintEstimate?.gas}
gasPrice={tokenMintEstimate?.gasPrice}
cost={tokenMintEstimate?.cost}
nonGas={canNonGas}
transaction="Mint (amount = 1000 WTF)"
/>
</div>
<DialogFooter>
{
isAllowancePaymaster ? (
<Button
size="sm"
className="w-full"
disabled={isMintLoading}
onClick={() => mint()}
>开始执行</Button>
) : (
<Button
size="sm"
className="w-full"
disabled={isApprovePaymasterLoading}
onClick={() => approvePaymaster()}
>授权代币作为手续费支付</Button>
)
}
</DialogFooter>
</DialogContent>
</Dialog>
)
}在
components/mint-nft-modal中使用useNFT完成逻辑交互// 1. 使用 useNft hook 获取 nftBalance,mint等执行函数和状态
// 2. 计算fee, GasPrice, 实际支出
// 3. 使用Checkout组件展示支付信息
// 4. 新增执行按钮
const MintNFTModal = () => {
const [openModal, setOpenModal] = useState<boolean>(false);
const {
nftBalance,
getNFTMintEstimate,
mint,
isMintLoading
} = useNft();
const { canNonGas } = useToken();
const {
data: nftMintEstimate,
isLoading: isTokenMintEstimateLoading
} = useQuery("nftMintEstimate", getNFTMintEstimate, {
enabled: openModal
})
return (
<Dialog open={openModal} onOpenChange={setOpenModal}>
<DialogTrigger>
<a className="text-blue-600 cursor-pointer">Mint</a>
</DialogTrigger>
<DialogContent>
<DialogHeader>
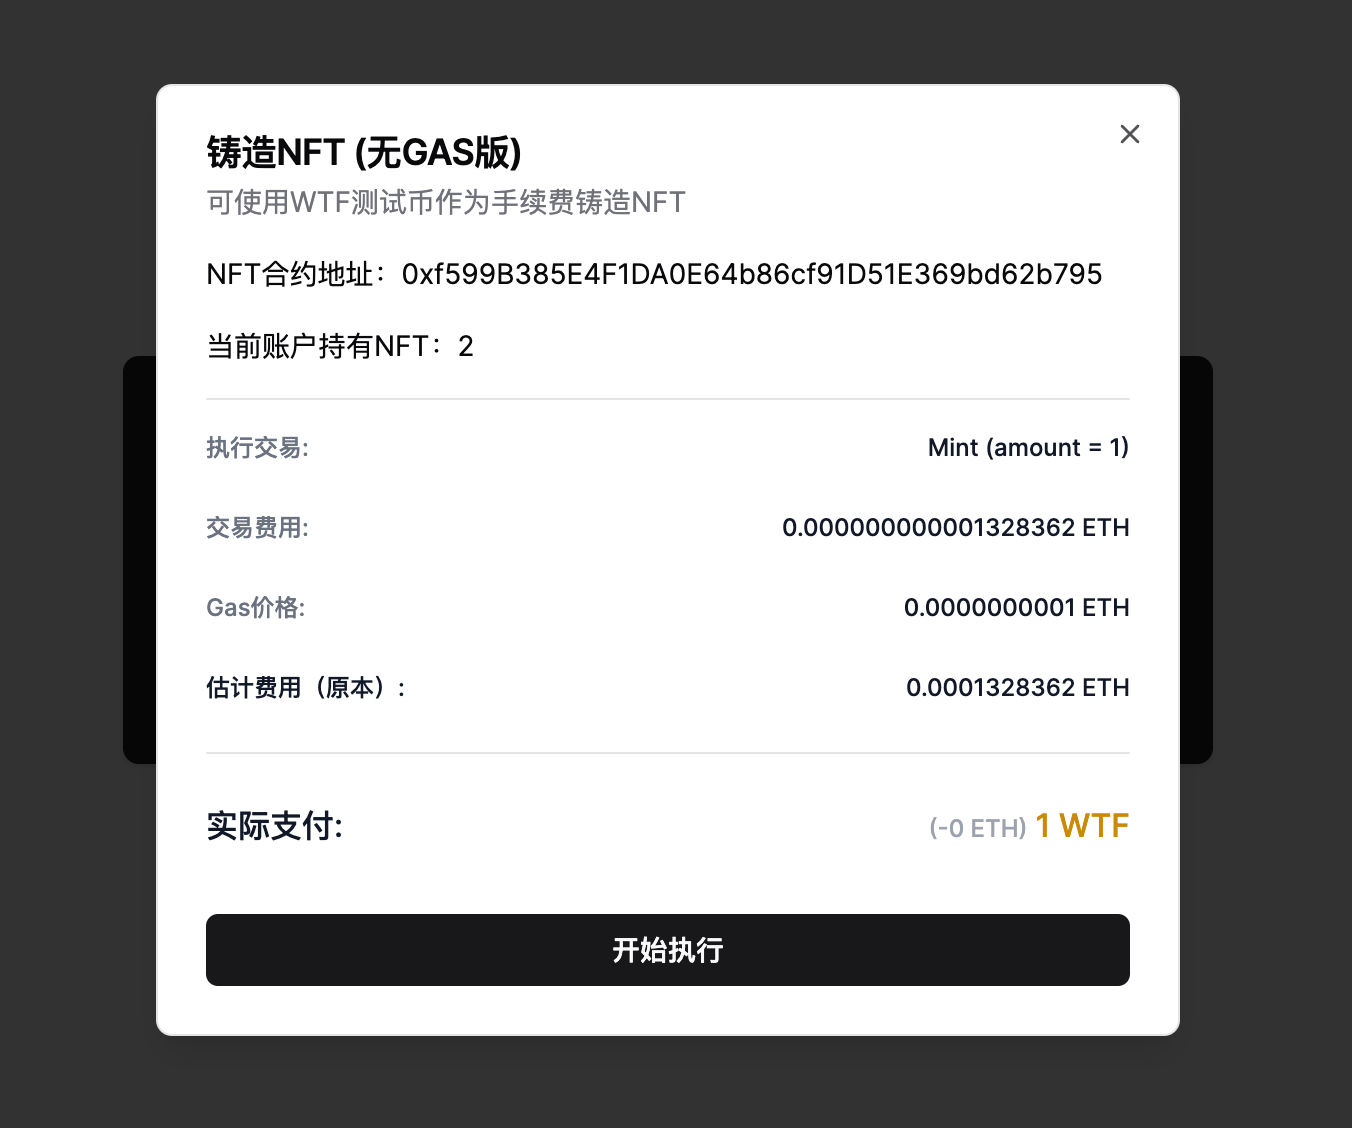
<DialogTitle>铸造NFT {canNonGas && "(无GAS版)"}</DialogTitle>
<DialogDescription>可使用WTF测试币作为手续费</DialogDescription>
</DialogHeader>
<div className="flex flex-col gap-4 mb-4">
<div className="text-sm">NFT合约地址:{NFT_ADDRESS}</div>
<div className="text-sm">当前账户持有NFT:{nftBalance || 0}</div>
<Checkout
gas={nftMintEstimate?.gas}
gasPrice={nftMintEstimate?.gasPrice}
cost={nftMintEstimate?.cost}
nonGas={canNonGas}
transaction="Mint (amount = 1)"
/>
</div>
<DialogFooter>
<Button
size="sm"
className="w-full"
disabled={isMintLoading}
onClick={() => mint()}
>开始执行</Button>
</DialogFooter>
</DialogContent>
</Dialog>
)
}
此时我们已完成了前端开发,我们可以去页面中开始尝试paymaster的神奇吧!体验无Gas铸造NFT的过程。
- 导航到
http://localhost:3000并刷新页面。单击“连接钱包”链接您的 MetaMask 帐户。确保你持有zksync Sepolia测试网ETH - 查看paymaster余额,如果不够可以捐赠一些以满足正常是的运转
- 铸造Token用于NFT铸造的支付
- 开始NFT铸造,可以看到右侧一个签名,完成后即可满足最终的交易执行成功
- 导航到